


 This topic is locked
(sometimes called a floating fry saver, or floatie)
Text and diagrams by Chris Bell
Materials
* One ice cream container 2Ltr or 4Ltr.
* Some polystyrene strips
* a piece of Nylon fly screen approx - 6″ x 6″
* Glass Silicone sealer
* very course sand paper or wire brush to rough up plastic
* Stanley knife or other sharp hobby knife.
Preparation Steps
Using the Hobby knife, very carefully cut out two (2) windows on either side of the Ice cream container, approx - 10cm x 5cm (Fig 1) Size of window can be varied to suit size of container.
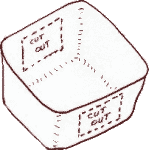
fig1
Using the window cut outs as a template, place on top of fly screen cut the nylon fly screen approx - 1 to 1½ cm larger ALL round than the cut out (Fig 2)
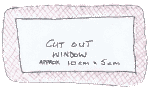
fig2
Cut four (4) styrene strips approx - 10cm x 2cm x 1cm (Fig 3)
fig3
Using wire brush or very course sand paper rough up the inside of the container around the window cut outs approx - 1 to 1½ cm wide and also the outer sides of the container where the styrene strips are to be glued. (Fig 4 )
I personally use a Wire wheel on the end of my drill. It is imperative that the plastic is roughed up where silicone is required, as it will not adhere properly to smooth plastic.
fig4
Assembly
Apply bead of Silicone to inside of container around the roughed up cut out window.
With the container on its side, place cut to size fly screen piece over cut out and using a moistened index finger press down edges onto the silicone working the silicone gently but firmly into the edge of the fly screen evenly.
Apply silicone to outer roughed up areas of the container and firmly press into place the styrene strips can be held in place by large clothes pegs.
fig5
Allow 24 hrs to cure
The completed unit should look like fig 6.
fig6
Fry / eggs can be milked directly into the hatchery which will float in the tank in the same conditions as the parents. Run an Air stone with adjustable air supply into the hatchery to maintain circulation. It is advisable to make several at the same time as they always come in handy.
The oblong containers, which are usually available from any Ice cream parlour for 40c or 50c, are equally suitable. (Fig 7)
fig7
The following variations are, however, required.
Windows are cut vertically in the ENDS of the container.
Styrene strips need to be a MIN of 20cm x 2½cm x 1½cm and are siliconed on the sides under the outer lip of the container.
Due to larger volume of water the air stone must be at the window in order to generate good circulation.
I have been using the above units for about 20 years and have found them suitable for raising all eggs/fry from 8/10 days post spawn (heads & tails) to 2cm. Use a purpose made egg tumbler if eggs need to be stripped earlier.


