This topic is locked
by Ed Munday (diagram by Judy Munday)
After receiving a number of inquires about my home made fluidized sand filter I thought it might be a suitable article for the magazine so here it is.
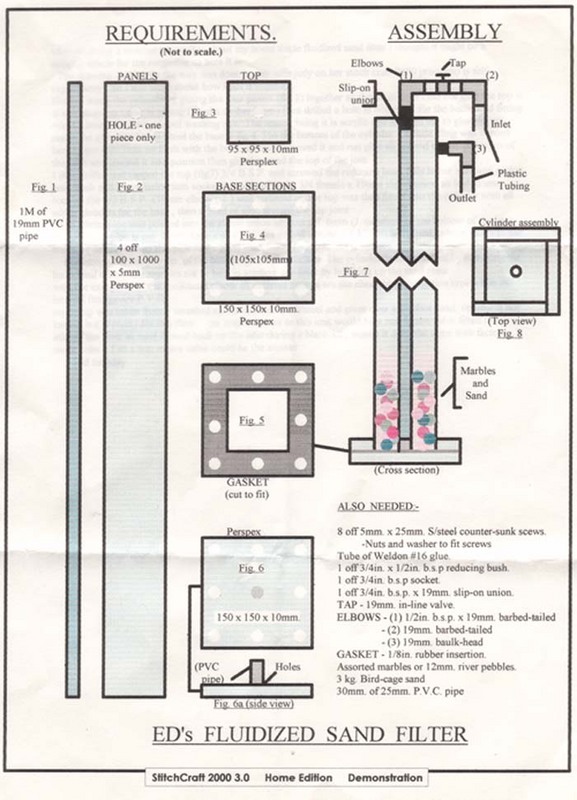
The drawing (which by the way was done by my wife judy on her stitch craft 2000 program) is self explanatory . So I will write about how I put it together.
Firstly I made the cylinder by gluing the four panels (Fig.2) together as shown in (Fig.8) I did not glue the top in at this stage. To assist in gluing I used a timber form, I then drilled a hole in one panel for the baulkhead fitting which came from a worIdpool washing m/c. The reason being it is acrylic and allowed me to glue the nut inside the cylinder.
I then fitted the base (Fig.4) to the bottom of the cylinder (a little filing was needed here to get it to slide on flush with the bottom) then removed it and run glue all around the inside edges of the base and push into position then glued around the top of the join I then drilled and tapped the top (Fig.3) 3/4 B.S.P. and screwed the reducing bush fully home screwed socket onto bush and slip-on joiner into socket (could not buy a 3/4 female x 19mm slip-on joiner so had to use socket) the 1/2 B. S.P. x19mrn elbow ( 1 ) was screwed in, the top was then fitted into the cylinder with all edges glued as for the base, then a bead of glue around the top joint.The 19mm pipe was pushed into the slip-on joiner and cut off 6mm (I/4in)short of the bottom of the base. The 25in pipe is cut 30mm long a row of holes drilled around it ( 3/16in) and glued to base, holes to the bottom ( see fig 6 & 6a) this pipe fits around the 19mm pipe to locate it.
I then counter sunk the bottom of the base to give a flat surface. The cylinder can be charged by removing the baulkhead elbow the marbles are to help in starting the filter by breaking up the sand mass with the exception of the baulkhead elbow all external fittings are the cheap black irrigation type while the internal fittings are P. V. C. my pump was taken from a smashed up dishwasher it is steel and gives over a six foot head, volume is not known but is plenty for this filter. An improvement to this unit would be a non return valve fitted to the inlet of the filter as sand flowed back up the inlet during a blackout/power outage, maybe it does the same with factory made units if so a non return valve could be the answer.
Figure below: