Jump to content


Posted Image

PCS & Stuart M. Grant - Cichlid Preservation Fund - Details here


Photo

2 Tier 4ft Setup


  • Please log in to reply
13 replies to this topic

#1 Cawdor

Cawdor
  • Admin
  • Joined: 26-December 05
  • Location: Byford

Posted 09 January 2011 - 01:20 PM

Gday, after grabbing the two 4ft tanks a while back and (with some help) cutting out the internal filters, I have now started working on setting these up and I decided I might as well do a journal!

Both tanks were painted and I needed to get the paint off and repaint them.
I was told that you use methylated spirits or mineral turps, depending on whether your paint is water or oil based (I can't remember which way around it was). So I bought bottles of both since I had no idea what the existing paint was based on.

Turns out the methylated spirits worked really well, some points I have learned:

  • using a paint brush, coat the paint liberally in methylated spirits and wait for a few minutes
  • use a *new* razorblade to strip the paint
I made the mistake of initially using an old, no name scraper that had an old blade in it. Not only did the scraper break (the blade would retract all the time when pushing the scraper) but it was really tedious. So I went and bought a brand name scraper with new blades, what a difference it made!! Paint was coming off really easy.

I was told that to ensure paint adhesion long term I could use a preparation liquid that works even on glass - it wasn't expensive so I gave it a shot. Put it on using a paint brush and after 90 min it's ready to be painted on. It makes the glass sticky so the paint stays on better (that's the theory). The stuff is called ESP (Easy Surface Prep).

More to come as I progress!!


Start - as you can see from the side panel it's messy and tedious.


Then - better progress on the back panel thanks to the right tools.


Both tanks without paint.


The first coat on the back panels


Final coat on all three panels


The stand, made to order by fellow PCS Club Member scroogy1 - thanks very much!!


Update 12/1: MDF sheets cut, luckily I still had some lying around. Sometimes it pays off not to throw anything out, haha biggrin.gif


Sheets on the stand


Empty tanks on the stand


Top tank, cleaned (sort of) and filled up to test for leaks


Bottom tank, filled up and soaking some wood pieces
notice I have put the bottom tank onto a dark cloth as a little experiment to see if it makes fish less skittish than having a white bottom.


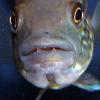
Update 16/1 - both tanks up and running and stocked. Pic of one of my hoplo catfish


Top tank, temporary residents are my Labidochromis sp "mbamba" juvies. They love the space, much better than a 12x12 cube.
Filtration is an Eheim 2028.


Bottom tank is my hoplo tank, 11 fish in there and three nice pieces of wood.
Filtration: 2 sponges and an Eheim Pickup


#2 sue

sue
  • PCS Club Member
  • Joined: 08-July 09
  • Location: Bassendean

Posted 09 January 2011 - 01:28 PM

Hi Tim Looks like you've done a really professional job on those tanks. They look great.

#3 Sarah Jayne

Sarah Jayne
  • Forum Member
  • Joined: 20-November 10
  • Location: PERTH

Posted 09 January 2011 - 06:22 PM

tanks look awesome! looks like i might have to scrap my bubblie backing and give it a coat of paint. can't what to see what goes in them smile.gif good job!

#4 Neddy

Neddy
  • Forum Member
  • Joined: 24-November 10

Posted 09 January 2011 - 08:14 PM

Hah, it was only three days ago that I was scraping the paint off the 5ft tank...metho certainly is the way to go!.....these going to be breeders or display tanks? How did you go with removing the silicone from inside the tank? Any tips?
Well done looks good

#5 Cawdor

Cawdor
  • Admin
  • Joined: 26-December 05
  • Location: Byford

Posted 09 January 2011 - 11:16 PM

One will definitely be a breeding tank for various types of catfish, the other I am not yet decided on smile.gif
The leftover silicone from the internal filters was easily removed with a razor scraper.

I am struggling to clean up the calcium on the glass though - vinegar just doesn't seem to cut it sad.gif

#6 sandgroper

sandgroper
  • Forum Member
  • Joined: 24-April 06
  • Location: Near Malaga

Posted 11 January 2011 - 12:09 AM

Have you tried the calcium removable product in a spray bottle that they sell at the lfs.I've never used it my self but it might be worth a try,don't think it was very expensive.cheers steve

#7 Cawdor

Cawdor
  • Admin
  • Joined: 26-December 05
  • Location: Byford

Posted 11 January 2011 - 12:35 AM

At which LFS have you seen it? I haven't tried any other product, cleaning is the last thing on my list before filling them up. Which is now smile.gif

#8 Robbotheyobbo

Robbotheyobbo
  • Forum Member
  • Joined: 05-July 08
  • Location:Hammond Park W.A.
  • Location: Mars

Posted 11 January 2011 - 06:29 AM

Great job Tim, try lemon juice to remove the calcium

#9 danotaylor

danotaylor
  • Forum Member
  • Joined: 22-April 10
  • Location: east perth

Posted 11 January 2011 - 07:30 AM

Hi Tim...
I bought a tank last year that was marine and had been sitting out in the sun for ages...the salt and calcium build up was intense...I use a glass cleaning product called CLR. It stripped the deposits off instantly. A litle on a cloth, wipe and ta-da! You do need to wear gloves though as it is corrosive but because glass is not porous will not harm your tank. Just need to give it a good rinse out and be careful not to let it have too much contact with the silicone bead if you need to use it on the inside. You can get it at Bunnings or any hardware.
HTH,
Danny
By hte way, the tanks and stand look stellar too mate! Are they 4x18x18?

Edited by danotaylor, 11 January 2011 - 07:32 AM.


#10 werdna

werdna
  • Forum Member
  • Joined: 10-March 07
  • Location: Coogee

Posted 11 January 2011 - 11:43 AM

+1 for CLR.
I use it every single time I strip a tank to give it a clean.

For really stubborn calcium stains, just leave straight CLR on it for about 1 hour, then rinse it straight off.

Andrew

#11 Cawdor

Cawdor
  • Admin
  • Joined: 26-December 05
  • Location: Byford

Posted 12 January 2011 - 06:37 PM

Update 12/1 - almost there smile.gif
Pics added to first post.

#12 bradfitzy

bradfitzy
  • Forum Member
  • Joined: 14-April 07
  • Location: Balga

Posted 12 January 2011 - 06:57 PM

looking good Tim.

Brad

#13 Cawdor

Cawdor
  • Admin
  • Joined: 26-December 05
  • Location: Byford

Posted 16 January 2011 - 03:33 PM

Tanks up and running, photos added to first post.

#14 (abc)Jarrad

(abc)Jarrad
  • Forum Member
  • Joined: 29-July 10
  • Location: greenmount

Posted 01 February 2011 - 12:07 PM

great tranformation tum the tanks look awesome you did a very nice job there wink.gif


1 user(s) are reading this topic

0 members, 1 guests, 0 anonymous users